DentiMax 20 comes with over 100 built in reports. These reports help you track finances, patient retention, claims and more. In some cases, your practice may even need to commission a customized report specifically programmed for your office. That said, sometimes it’s nice to personalize your own reporting experience since you’re the one who has to look at the reports every day. Here are a few ways you can have personalized reporting for your practice to make your reports sparkle.
Before you Start
Once you decide to change a report, there are a few things that will make the process easier. First, learn as much as you can about the report. Many reports have search criteria that you might not have noticed. Sometimes these criteria can already modify your report to your liking. The filters are found for most report by running them from the report screen or the ledger. Sometimes you can limit a report to only run for certain patients, providers or facilities.
Second, visit the DentiMax YouTube page. Some reports are not discussed, but a good many are. You might find some helpful hints right there.
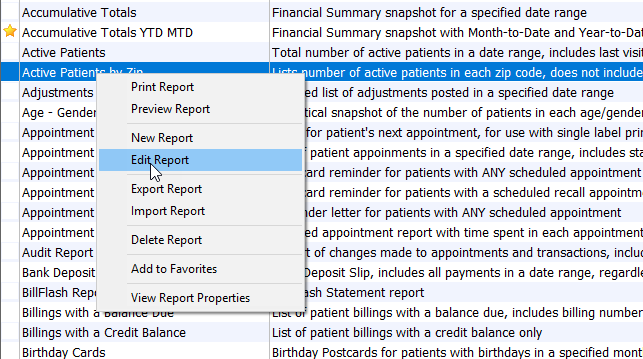
When you’re ready to make changes, you’ll need to open the report editor for most of the changes below. To do that, go to the report screen, right-click on the report in question and select "Edit".
A Note on Safe and Efficient Personalized Reporting
You’ll notice that DentiMax won’t let you save over an existing report. This is to make sure that if you ever make a mistake, you still have the original report. When you’re done editing, click "Save As" rather than "Save" and give your personalized report a name you’ll remember.
Sometimes, while you’re working, you’ll make several versions of your work. The report screen is just like any physical space in your office; it’s OK to add something new, but clean up after yourself or you’ll have trouble finding your work later. If you create nine copies of the report named "Day Sheet (1)", "Day Sheet***", "Day Sheet – USE", "Day Sheet New" an "Day Sheet mod". It’s going to be challenging for you to remember which one is real. And you wrote them. It will be impossible for the rest of your staff. Consider an explanatory name like "Day Sheet – Large Text".
Let’s start.
Change your Preferences
This one doesn’t require any editing at all. DentiMax has some built in customization options for your statements and ledgers. To access them, go to File->Program Preferences in the main menu and select the Reports tab. You can change the settings and affect the look and feel of your statements and ledger reports. Let’s go through each of the options.
Standard Patient Type
Some practices elect to show the total amount charged regardless of insurance responsibility. Some practices do not. This option will let you choose which is more appropriate for your office.
Patient Statement Details
Thee options alter the visual layout of your statements. You can select to show or hide the Credit Card Box on the return slip, show or hide a detailed breakdown of charges and payments, and alter he look of notes. Many practices do not choose to put notes on their statements, but if you do, play with this last option to see which layout is more to your liking.
Ledger Report
This options is pretty self-explanatory. You can elect to print the ledger in color or in black and white.
Personalized Fonts and Styles
Although the primary function of the report designer is to write software to interface with your practice’s data, it does have limited visual formatting tools similar to Microsoft Word or Google Docs. Your personalized reporting choices can modify the text font and size, justification and even colors.
To start. Edit the report in question and select "Design" from the top bar. To make sure you have all the formatting tools, click View->Toolbars and check "Size" and "Formatting".
The formatting buttons are pictures below and are similar to most other word processing programs.
Click on the text you want to alter and set the settings you choose.
You can also move the text around on the document, but use caution. Most reports are broken up in bands (pictured below)
Moving text left or right or up and down within a band won’t alter the functionality in the report, but if you want to move text above or below the exiting band barriers, it can alter when and how the report processes information.
Personalized Logos on Statements
Adding your practice logo to your personalized reporting and statements can add a bit of style to your statements. The steps to add one are actually quite simple, but making it look good will take a few steps outside of DentiMax. I strongly recommend some photo editing software, like Adobe Photoshop.
The first step is to resize your image within the photo editor. The report programmer has some crude photo editing capabilities, but it is primarily a data tool, so resizing the image in an external program will bring much better results. Size the image to a size around 100×100 to 150×150 pixels and save the image. If your image is not square shaped, it will yield best results if you can save the file as a PNG with transparency. You can also save as .jpg, .gif or .bmp.
Within report editor click the "insert image" icon. If the icon isn’t visible, got to View->Toolbars and select Standard Components. Click on the report in the area where you wish to place the image. You will see a square like that pictured below.
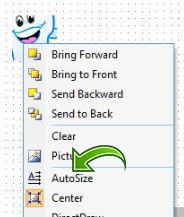
Right click on the square and click the option for Picture, and a file prompt will pop up allowing you to locate the image you saved in the prior step.
Once you import the image, right click the new image and select Auto-size.
There you go. your image is complete.
This version of customization can require a bit of photo editing skill. DentiMax does offer report customization with logos for a charge.
Hide Unneeded Information
Sometimes a report is perfect for your needs, but contains more information than you need. Sometimes this makes the information you need harder to find and removing the other information is ideal. It might seem like a good idea to delete that extra information within the report editor, but often times deleting something from the report can have unexpected side effect if those pieces of information are required for the calculations of the report.
There is still a personalized reporting solution. Without deleting information, it is possible to simply make the information invisible, and this will allow the information to contribute to the programs calculations without displaying on the page. To do this, edit the report and find the piece of information you wish to delete. For this example, I’ll remove the Chart Number from the Aging Report.
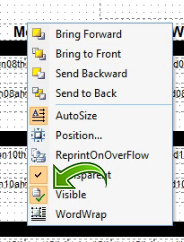
Right click on the information and find the area labeled Visible and uncheck it.
That’s it. Save the report and you’ll see the information is gone.
(Note that the Credit Card Box on Statements are the exception to the rule on this, in that the visibility of the Credit Card Box can be directly altered from the program preferences.)
Export to Excel
Sometimes reports are more useful in an Excel spreadsheet than on paper, so we’ve made it possible for you to export every report to Excel. To do this, run the report and hit the print icon as if you were going to print the report normally.
In the box that pops up, look to the bottom and choose the option "Print to file". Select "Microsoft Excel Workbook" and select the location of the file you want to save.
From there you can open the new file in Excel.
A quick note: You can export any report, but some translate to Excel better than others. For example, any report that is displayed like a like a table (Day Sheet, Unapplied Deposits, etc) will export to Excel very well. Any report that is not displayed as a table (ADA Forms, Route Slips, etc) will export to Excel, but may not be as readable. In cases like this, exporting to another format like .PDF might be more advantageous. Of course, this is largely subjective and your personal use and tastes will help make these decisions for you.
Summary
Changing the structure or the calculations of a report can become quite complex, but it doesn’t mean you can’t make them more aesthetically personal to your office. These are the reports that you look at every day and that will represent your practice to patients, and there’s nothing wrong with adjusting it to your style.
Of course personalized reporting has it’s limits. You can commission more complicated changes and custom reports, as well. For custom reports, you can always fill out a report request form to set up a consultation.


